So many updates to make… I’ll start with this and fill in some blanks. A lot of my attention this year has been a return to woodworking. That’s a long enough story to be it’s own post so I’ll save that for later. The basic premise here is that I am making a lot of dust so I purchased a dust collection system. But who wants to drag a hose around to each machine, each time you go to use it (I am guessing no one)? And what’s the point of all the HomeAssistant and ESPHome stuff if I can’t automate the little annoyances? Well, now where at the topic of this post – Smart Blast Gate for Workshop Dust Collection.
The primary pieces of equipment I need dust collection for are the lathe, band saw, router table, and cnc. There are other opportunities of course, such as table saws, circular saws, planers, sanders, floor sweep, etc. Here are the details of the main pieces of equipment:
- Jet JWL-1221VS Wood Lathe
- WEN BA1487 14″ Band Saw
- Bosch RA1181 & 1617EVS Router Table
- Sienci Labs AltMill
For the dust collection itself, I went with the WEN DC1300 system. This unit advertises 1,300 CFM with a 50 gallon collection bag and a 5 micron filtering bag. This is more than good enough for my use cases. For now I am going to use 4″ heavy duty PVC hose to interconnect everything although I may change to a proper tube/pipe system later.
The blast gate system…

I shopped the normal manual blast gates that had very mixed reviews and ultimately, given the price point and poor performance, decided I wanted something better – or at least automated. This led me to some really impressive smart blast gates that also had impressive price tags. So I started searching for 3D printable options thinking surely someone else has desired this solution, and they had. I stumbled upon a YouTube video by Nils Rasmusson that gave a great review on this Ball Valve gate by PeterH1500.
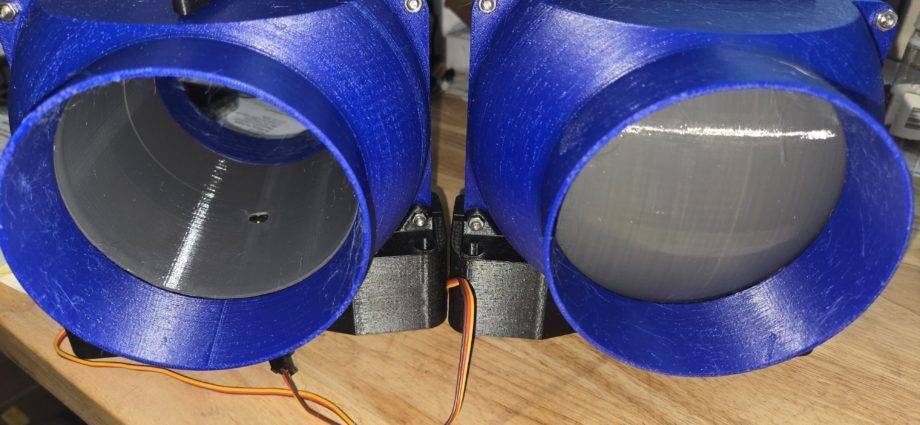
His model is great, but as he later stated, it was rather large. Luckily PeterH1500 made a smaller, Truncated Ball Valve that would work much better for my needs. And this is where I started working on making it a ‘Smart’ blast gate. I later noticed someone else did a different variation of making it smart but I had already completed my prototype so oh well.
My efforts to make this smart were not sophisticated. Using TinkerCad, I modified the bottom bearing.stl to accept a MG996R servo gear and then modified the bracket.stl to hold the servo. Simple right? The modified files can be found here in my download section or on Printables.
Making it Smart
Since I already use a combination of HomeAssistant, ESPHome, and NodeMCUs to control other ventilation automation, it made sense to use the same concept on the blast gate.
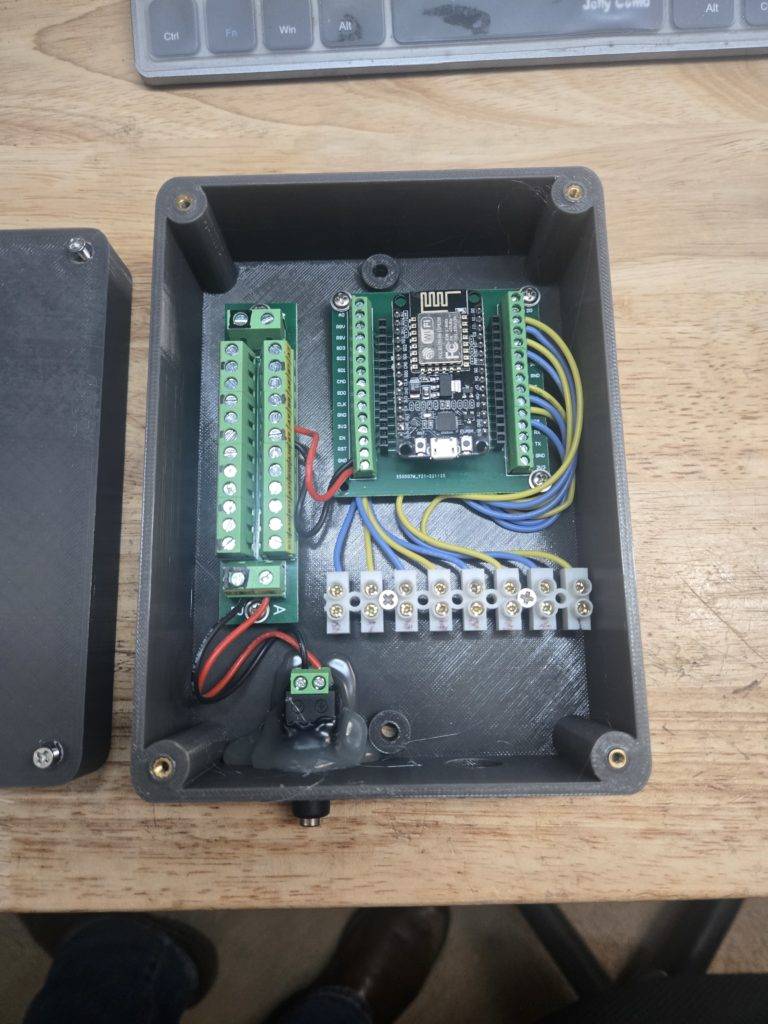
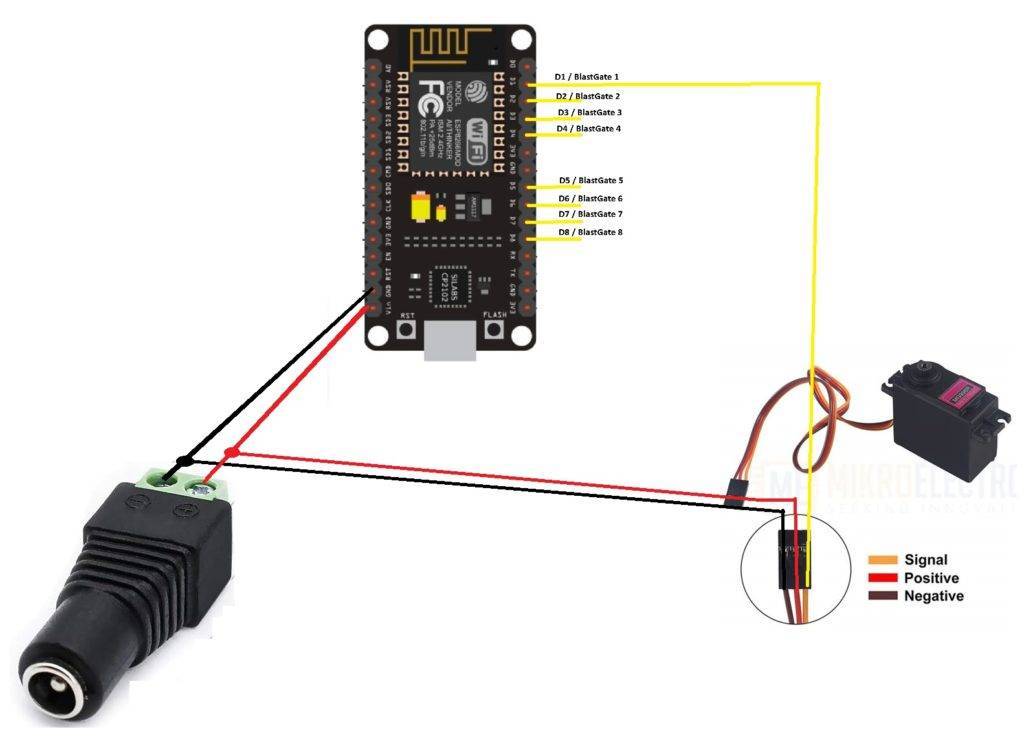
The NodeMCU V2 ESP8266 can control 8 individual gates. Officially the NodeMCU supports 5VDC but I was able to use a 6VDC 5A power supply which will then provide ample power to the servos. Wiring schematic is pretty straight forward. Positive and Negative are shared among the NodeMCU and Servos. The data pins are 1 for 1 from the NodeMCU to the Servos.
Parts List
- NodeMCU
- Power Supply with adapter
- MG996R Servo
- ESP8266 NodeMCU Development/Breakout Board (optional)
- 3 Conductor 22AWG Wire (for servo connections/extensions)
- 2.54mm 3 Pin SM Connectors (optional for servo extensions)
- Terminal Block (for easy servo connections)
- Power Distribution Block (for easy power connections)
- 3D Printer with PETG or ABS filament (for durability)
- STL files for controller case (optional base and lid)
Schematic

ESPHome Code
substitutions:
  board: nodemcuv2
  device_name: blastgate
  friendly_name: BlastGate

esphome:
  name: ${device_name}
  platform: ESP8266
  board: ${board}

logger:

api:
  encryption:
    key: "encryptionkeypass"

ota:
  - platform: esphome
    password: "otapassword"

wifi:
  ssid: !secret wifi_ssid #or enter your WiFi SSID
  password: !secret wifi_password #or enter your WiFi password
  fast_connect: on
  domain: .local.lan
  reboot_timeout: 0s
  manual_ip:
    static_ip: xxx.xxx.xx.xxx #use your assigned IP address
    gateway: xxx.xxx.xx.xxx #use your gateway address
    subnet: 255.255.255.0
  power_save_mode: none

  ap:
    ssid: "Blastgate Fallback Hotspot"
    password: "hotspotpassword"

captive_portal:

web_server:
  port: 80

output:
  - platform: esp8266_pwm
    id: pwm_output1
    pin: D1
    frequency: 50 Hz
  - platform: esp8266_pwm
    id: pwm_output2
    pin: D2
    frequency: 50 Hz
  - platform: esp8266_pwm
    id: pwm_output3
    pin: D3
    frequency: 50 Hz
  - platform: esp8266_pwm
    id: pwm_output4
    pin: D4
    frequency: 50 Hz
  - platform: esp8266_pwm
    id: pwm_output5
    pin: D5
    frequency: 50 Hz
  - platform: esp8266_pwm
    id: pwm_output6
    pin: D6
    frequency: 50 Hz
  - platform: esp8266_pwm
    id: pwm_output7
    pin: D7
    frequency: 50 Hz
  - platform: esp8266_pwm
    id: pwm_output8
    pin: D8
    frequency: 50 Hz

servo:
  - id: damper1
    output: pwm_output1
  - id: damper2
    output: pwm_output2
  - id: damper3
    output: pwm_output3
  - id: damper4
    output: pwm_output4
  - id: damper5
    output: pwm_output5
  - id: damper6
    output: pwm_output6
  - id: damper7
    output: pwm_output7
  - id: damper8
    output: pwm_output8

cover:
  - platform: template
    name: "${friendly_name} 1"
    id: blastgate1
    optimistic: true
    device_class: damper
    open_action:
      - servo.write:
          id: damper1
          level: 85.0%
    close_action:
      - servo.write:
          id: damper1
          level: -35.0%
    stop_action:
      - servo.write:
          id: damper1
          level: -30.0%
      - servo.detach: damper1
  - platform: template
    name: "${friendly_name} 2"
    id: blastgate2
    optimistic: true
    device_class: damper
    open_action:
      - servo.write:
          id: damper2
          level: 82.0%
    close_action:
      - servo.write:
          id: damper2
          level: -30.0%
    stop_action:
      - servo.write:
          id: damper2
          level: -30.0%
      - servo.detach: damper2
  - platform: template
    name: "${friendly_name} 3"
    id: blastgate3
    optimistic: true
    device_class: damper
    open_action:
      - servo.write:
          id: damper3
          level: 82.0%
    close_action:
      - servo.write:
          id: damper3
          level: -30.0%
    stop_action:
      - servo.write:
          id: damper3
          level: -30.0%
      - servo.detach: damper3
  - platform: template
    name: "${friendly_name} 4"
    id: blastgate4
    optimistic: true
    device_class: damper
    open_action:
      - servo.write:
          id: damper4
          level: 85.0%
    close_action:
      - servo.write:
          id: damper4
          level: -30.0%
    stop_action:
      - servo.write:
          id: damper4
          level: -30.0%
      - servo.detach: damper4
  - platform: template
    name: "${friendly_name} 5"
    id: blastgate5
    optimistic: true
    device_class: damper
    open_action:
      - servo.write:
          id: damper5
          level: 82.0%
    close_action:
      - servo.write:
          id: damper5
          level: -30.0%
    stop_action:
      - servo.write:
          id: damper5
          level: -30.0%
      - servo.detach: damper5
  - platform: template
    name: "${friendly_name} 6"
    id: blastgate6
    optimistic: true
    device_class: damper
    open_action:
      - servo.write:
          id: damper6
          level: 82.0%
    close_action:
      - servo.write:
          id: damper6
          level: -30.0%
    stop_action:
      - servo.write:
          id: damper6
          level: -30.0%
      - servo.detach: damper6
  - platform: template
    name: "${friendly_name} 7"
    id: blastgate7
    optimistic: true
    device_class: damper
    open_action:
      - servo.write:
          id: damper7
          level: 82.0%
    close_action:
      - servo.write:
          id: damper7
          level: -30.0%
    stop_action:
      - servo.write:
          id: damper7
          level: -30.0%
      - servo.detach: damper7
  - platform: template
    name: "${friendly_name} 8"
    id: blastgate8
    optimistic: true
    device_class: damper
    open_action:
      - servo.write:
          id: damper8
          level: 82.0%
    close_action:
      - servo.write:
          id: damper8
          level: -30.0%
    stop_action:
      - servo.write:
          id: damper8
          level: -30.0%
      - servo.detach: damper8
Conclusion
And that’s pretty much it! I currently have 4 blast gates configured in my workshop and will likely add at least one more in the near future. My advice if you build this, is to go ahead and overbuild. You may not need all 8 servos or blast gates but if you have the spare wire and connectors, wire them in the controller now so you don’t need to take anything apart later. Once installed, you have control over these gates and can create automations such as using a current or power sensor (or outlet) to open the respective gate and turn on the dust collector! How cool is that!?!?
Here is a video short from my initial testing: YouTube
